Beginners: Access Modifiers Exemplified
In the recent past, I have been involved in code review where I found a code base which is dominated with “public” access modifiers, and I was like, seriously?. In my recommendations I had to point there was lot to be done in terms of code accessibility levels, not everything belonged to the public :).
And therefore in this post, we will be expounding modifiers found in the .NET framework. Modifiers are used to modify the declaration of types(Interface, Class, Struct) and type members (fields, properties, events, delegates, methods).
In C# there are quite a number of modifiers but in this post we are going to major with access modifiers. Access modifiers specifies the accessibility of types and type members. They include
- Private
- Internal
- Protected
- Protected internal
- Public
Remember only one access modifier that is allowed in a type except when using “protected internal”. Depending on the context in which a member declaration occurs, only certain declared accessibilities are permitted. If no access modifier is specified in a member declaration, a default access modifier is used
To bring the point closer home, I would like to think of a family set up where we have a father, mother and children, and the father has a few properties including cars.
We will be using the following classes “Calculator.cs” in assembly “CalculatorLib”
public class Calculator { private void Add() { } internal void Subtract() { } protected void Divide() { } protected internal void Multiply() { } public void Modulus() { } }The following image shows what of “Calculator.cs” is visible when called from “CalculatorClient.cs” class in the same assembly
Figure 1
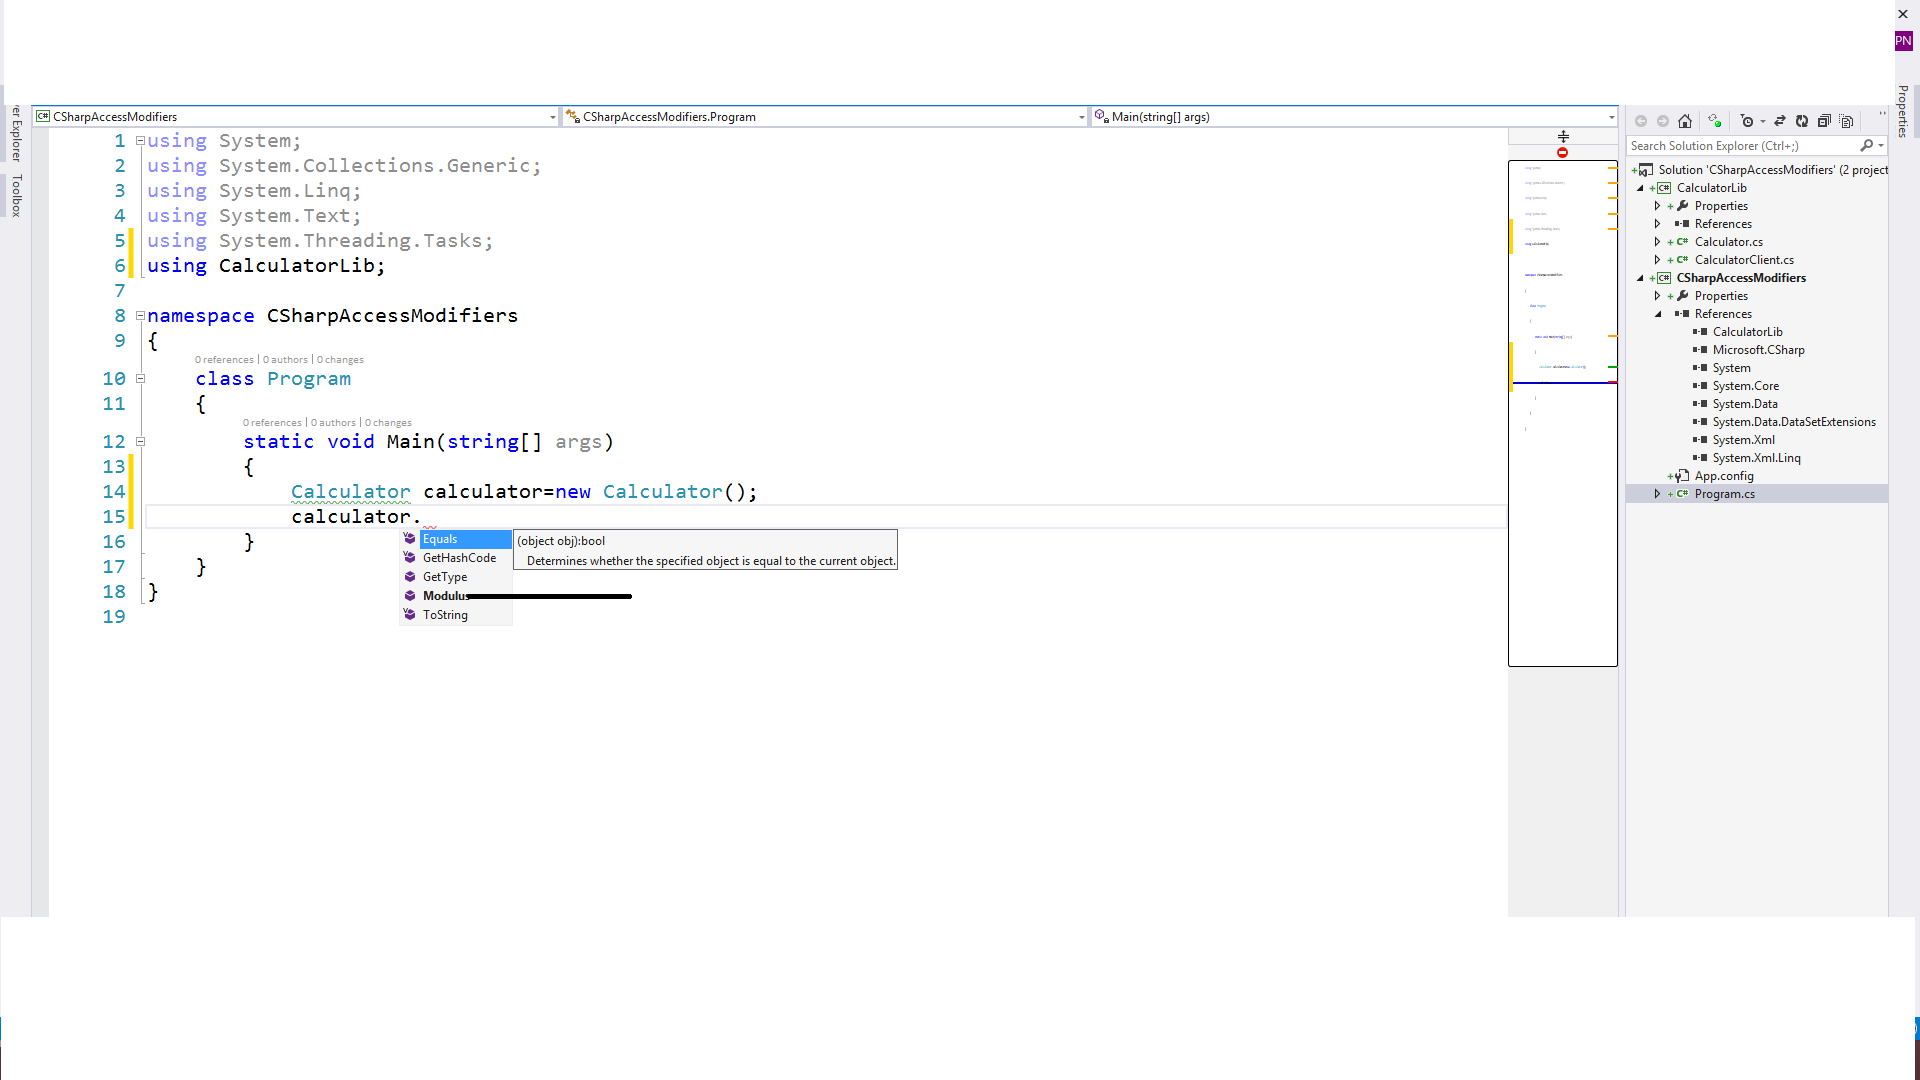
The following image shows what of “Calculator.cs” is visible when called from “Program.cs” class in a different assembly
Figure 2
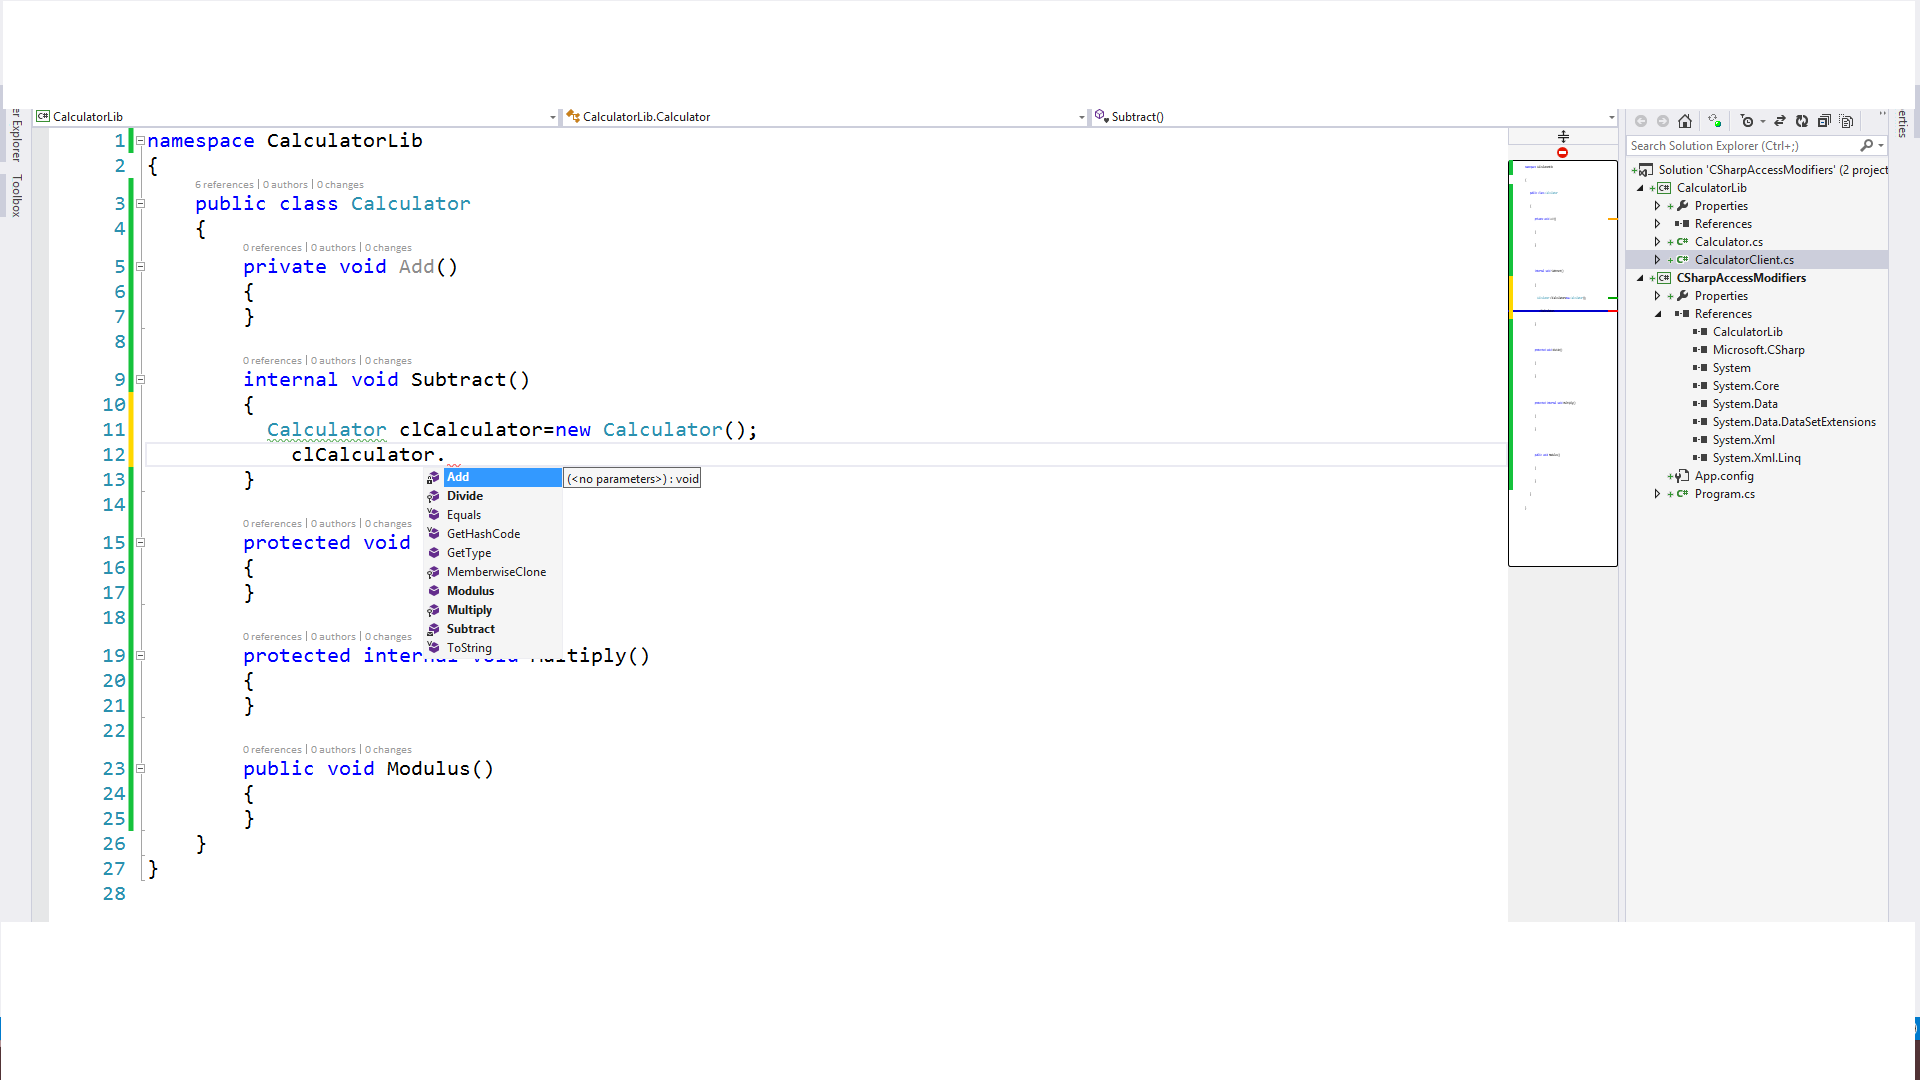
The following image shows what of “Calculator.cs” is visible when called inside one of its own members
Figure 3
The following image shows what of “Calculator.cs” is visible when called from “CalculatorDerived.cs” class which is its derived class
Figure 4
Private
This proves to be the least permissive and restrictive acess modifer.A private member is only visible to the containing type and its members. Its used in class members and nested class. Remember its not used in top level class.
The private method “Add” can only be accessed by any other member within the class and not outside the class. It’s not even visible to other classes within the same assembly.
Refer to “Figure 3”, you be able to identify “Add” method visible in the containing class and not visible to any of the other figures
Internal
This level of accessibility can used in top level classes, nested class and there members. They are acccessed by the members of the same assembly. The use of internal is in scenarios where you intend components in the same assembly to communicate and share functionalities but as without exposing the functionality to the world (other assemblies).
And so even if you give out you component in terms of a .dll, the internal members are not exposed to the consumer of your library/assembly.
Figure 1, 3, and 4, you are able to see “Subtract” since they are in the same assembly. It’s not visible in Figure 2 since that another assembly
Protected.
This is a member modifier, and can also be used with nested classes. Protected members are only visible to derived classes and the declaring type as well. This modifier is used hand in hand in inheritance as we will come to see later. One other note is that struct cannot be protected as they cannot be inherited.
Visible in Figure 3 since its in the declaring class and also in Figure 4 since its “CalculatorClient.cs” has derived from “Calculator”.
Protected internal
Just as the name is suggesting by the combination of the modifiers, it means that every member with this modifier can be assessed by both types in the same assembly as well as derived classes.
“Multiply” is visible in Figure 1 because of the “internal” modifier and visible in Figure 4 because of the “protected” modifier.
Public
This is an access modifier for types and type members. Public access is the most permissive access level. There are no restrictions on accessing public members. Anything with public modifier is visible literally every where.
“Modulus” which is public, is visible anywhere you should be able to see it in every figure above.
Hope this post,helps you to use the access modifiers knowledgeably and confidently.
The source code is hosted on github
Happy coding!!


How To: Convert ASP.NET Web API to Azure API app
In my last post, I introduced and discussed about the new azure API apps. It’s really nothing more than your asp.net web API with a new way and form to expose the metadata so to speak. Its actually a web app with other additional features for hosting. Azure API is hosted within a web app.
In the pipeline to Azure API app, there a gateway which performs other stuff before reaching the Azure API app. The gateway is just another web app able to perform extra functionality like authetication with providers.
Every resource group with that contains an API app also includes a gateway. The azure API app expose there metadate via a new representation swagger. Its a new powerful representation of RESTful API.
In this post we are looking at how to convert an already existing ASP.NET web api to azure api app. I will be using visual studio 2013.
Open visual studio 2013, and create a new ASP.NET Web api.

To keep things simple, I am not using any authentication in this post. We will make a few changes to ValuesController, make sure it look like show below
public class StudentController : ApiController
{
public IHttpActionResult Get()
{
var students = Students();

return Ok(students);
}

private List<Student> Students()
{
var students = new List<Student>();
IGenerationSessionFactory factory = AutoPocoContainer.Configure(
x =>
{
x.Conventions(c => { c.UseDefaultConventions();});
x.AddFromAssemblyContainingType<Student>();
});

//Create a session
IGenerationSession session = factory.CreateSession();
students = session.List<Student>(50)
.First(25)
.Impose(x => x.FirstName, "Bob")
.Next(25)
.Impose(x => x.FirstName, "Alice")
.All()
.Impose(x => x.LastName, "Pius")
.Random(10).Impose(x => x.LastName, "Peter")
.                                                  All().Get().ToList();

return students;
}
}
In our code we are using “autopoco” package to generate object to test with. So far this is just the normal ASP.NET web api. You can run the application and hit “http://localhost:26467/api/Student” and you will see the response of 50 students.
So how do we convert it to azure API app? Good question, and the essence of this post. To do that you simply add a new package called “swashbuckle” as shown below. Go package manager and search for “swashbuckle”

When this is installed a new file should be added in your App_Start, “SwaggerConfig.cs”. Ensure your solution looks like below

That’s the file that makes your expectations come true. Nothing much, nothing less. So run you application and hit the following url, “http://localhost:26467/swagger” which takes to a screen like below:

If your screen looks like above then everything so far looks good. So this generates a documentation of all the api operations in the project, you need to know it uses the same pipeline as how ASP.NET WEB api generate help pages. Click “Try it out!” and you will see a json response from the “GET” operation.
But where is the metadata? Navigate to “http://localhost:26467/swagger/docs/v1”, and this will generate a metadata file which is json in nature. We will talk on how to use this metadata file to generate a client sdk and other uses.

So from the image above.
1. Paths holds a collection of the API controllers in the projects
2. Indicate a API controller in our project “/api/Student”
3. Within every API controller, all available operations tagged with the http verb are listed.
4. The responses the operation supports.
That’s it!! 🙂 We have managed to convert/enable an ASP.NET Web api to a azure api app.
Source code can be on github
Quick look at azure app services
For a good period of time, azure has been offering azure websites and mobile services among others like biztalk services. Recently as part of the Azure SDK 2.5.1 release they have used a new term “App services”. As I tried to understand what this means, I was abit confused but found that its not a completely new term, its a combination what we know, with added features and advancements
App services basically is a collection of the things we already know and new additions that will help you with new integrations, building of rich, engaging and intelligent applications to help you scale as your business grows.
In the application services azure websites are termed “Web apps” while mobile services are termed “mobile apps”. If you visit your azure account you should be able to see these changes. Basically the current websites can easily be converted to web apps and therefore you are not going to rewrite your websites.
App services therefore contains
- Web apps
- Mobile apps
- Logical apps
- API apps.
- BizTalk API Apps
API apps
This new feature add on top of the ASP.NET Web API extending it with swagger metadata and an easy way to manage on the azure portal. It helps you easily build and consume API in the cloud The API Apps are behind a gateway which manages various add-on functionalities like authentication and update policies.
The gateways are created when you create a new API App and they live in stardand resource groups. Just like we generate the WSDL information with svcutil, you can easily the swagger metadata on your Azure API Apps on visual studion by adding “/swagger/docs/v1” to your browser address.
Another functionality is that you can package your Azure API App and upload it to azure market place for other consumers to use it.
As we will see in future posts, you can easily generate your Azure API App sdk in a few click. Existing ASP.NET Web API can be converted to Azure Web API without any complexity by simply adding Azure App API SDK.
With API Apps, you can easily on the azure portal define the access levels for you API App. There are three access levels namely
- Public (Anonymous) -Meaning does not require any form of authentication to access
- Internal -Only apps in your subscription can access and not available for public access
- Public (Authenticated) -Publicly available but you require authentication for access.
With API Apps, from azure portal you choose, by a click how you intend to update in case the API App is updated. You can choose from Off (You dont need update), Inherit and On meaning it will auto-update.
Something to note is that when you get an API app from the market place, you get an independent instance of that API App in your subscription, and there it runs in “isolation” from others, hence the reason to update when major or minor updates are done to the source package in the market place. 🙂
Web Apps
As mentioned earlier this were the formerly known as Websites. Some of the known feature includes
- They run .Net, node.js, Java,php and even python
- Web jobs for long running tasks, scheduled tasks
- Integrated VS publish and remote debugging
- Continous Intengrations with github, bitbucket, and Visual Studio Online
- Auto-load balance and auto scale
- Virtual networking and hybrid connections
- Site slots for staged deployments
In azure portal all of your existing websites instances are now web apps in app service. Web hosting plan is now app service plan, and an app service plan can host any app type of app service e.g Web, Mobile, Logic or API Apps.
Mobile Apps
Formerly mobile services, and mobile services continue to be available as a stand alone service and remain fully supported as of this writing. Mobile app intengrates all of the functionality of Mobile Services and they include the following features.
- Web jobs for long running tasks
- CI with github, bitbucket, VSO
- Auto-load balance auto scale GEO DR
- Virtual networking and hybrid connections
- Site slots for staged deployments
- Supports single sign-On from various identity providers like facebook, google, microsoft account, twitter Azure AD
- Offline sync which helps improve app responsiveness by caching server data locally on the device, make the app more resilient against network issues and syncing data across multiple devices helping solve any conflicts on the same record from different devices.
- Push notifications via scalable push notitication engine, you can send personalized push notification however you want it addressed.
- Easy connection to SaaS APIs.
Logic Apps.
This brings automation as a service by bringing new application for easy automation both with cloud and on premises systems. Some of its features includes:
- Visually create business processes and workflows
- There are a number of pre-built templates to get started
- Out of box support for popular SaaS and on premise applications
- You can create you custom logic apps
- There are biztalk APIs for expert integration scenario
That was just for introduction there is more information to come on the same.
As always happy coding 🙂
Management studio for Mongodb, -Mongodb Part 3
I like command prompts, and CLI’s at times, perhaps you too like them. But most of the time I love to visualize stuff. For example, how does mongodb databases, collections and documents look visually? What if we can have a quicker simple way to visually work and manage our mongodb.
MSSQl is to Sql Server Management studio as MySQL is to phpmyadmin (if I am not wrong :)), what about about mongodb..?
Welcome Robomongo, which is a shell-centric cross-platform MongoDB management tool. You can download and install Robomongo from there website here, select your platform, download and basically go through the installation steps easily.
Some of the features highlighted from the websites includes:
1. Robomongo embeds or rather uses same javascript engine that powers mongodb’s v2.2 shell, hence you can reuse your existing skills.
2. You can open as many shells as you need pointing to a single mongoDB database or many shells for many different databases.
3. Your code is executed statement by statement way.
4. You get autocompletion for all objects including functions well known by javascript runtime, including autocompletion for databases, collections and even your document.
Once you are finished installing, ensure your mongodb instance is running. Follow the steps the here to start mongod shell, once you are done take not of the port (default is 27017).
Then double robomongo to open it, and you will see the following screen:

From the screen you can see there is not connection, and so click on “create” link on the small child windows, and this present you with the following screen.

Provide a preffered name for you connection, in my case I gave it ‘Connection One’. Ensure that the address points to the server where you mongod instance is running and also the port is correct. In my case I am using local instance running on port 27017.
You can test the connection by clicking the ‘Test’ button, which should tell you if the connection succeeded or not. In my case I got a success like below.

For now I don’t have authorization to my mongodb, just click ‘close’, and then “save”, make sure your screen at this point is similar to this one:

You can see our connection is listed. At this point select “Connection One” and click on the “Connect” button. If you have done everything right then your screen should look like:

Voila! Here is you visual representation of you mongod instance, databases, collections, functions, documents etc. In my case I expanded to see how documents are represented as below
So now you know! If you want to explore robomongo, just right click on any level node on the tree, and see what you can achieve. But I can assure you can create, update, list and delete documents. You can also createa database here, add table functions which are just but javascript functions. There will be more advanced posts to come and so keep watch!!
Again happy coding nerdizzles 😀 !!
MongoDb Databases, Collections and Documents Explained – MongoDb Part 2
Welcome back for another post as promised on more about mongodb. If you missed part one of the series check it out here
The objectives of this post include.
- Explain mongodb in relation to a relational database for a better understanding
- What is a mongo database
- What are mongodb collections
- How to create a collection
- What are documents?
- How to create a document
Explain mongodb in relation to a relational database for a better understanding.
Being from a relational database, its of great importance to set some of the aspect clear. In a relational database, data is organized in records, in a database table. Basically in RDMS we have tables and rows.
In mongodb or nosql database, the data is structured in collections and documents. In mongodb the documents are just but JSON which is simply a key-value pair fields.JSON is also a natural data format for use in the application layer. JSON supports a richer and more flexible data structure than tables made up of columns and rows. In addition to supporting field types like number, string, Boolean, etc., JSON fields can be arrays or nested sub-objects. This means we can represent a set of sophisticated relations which are a closer representation of the objects our applications work with.
Creating a mongo database.
You can create a database even without using it. Simply use the following command on CLI
use accounts
This is illustrated in the following snapshot

By doing this we have created a database, but remember that mongo will not create the database until you create a collection in it.
Collections.
Mongodb collection are the containers that holds the documents. Mongodb creates a collection implicitly when you first reference a collection in a command. In the following figure I am going to connect to my mongo instance, and show you what I mean by this.

I have tried to be explicit as possible in describing the above image.Of importance is step 4 where we reference unexisting student collections and insert a document, and mongo creates students collection automatically.
There are other collections called capped collection. By definition from mongo documentation, this is a fixed sized collection that automatically overwrites its oldest entries when it reaches its maximum size. This sort of collection can easily be created with createCollection
db.createCollection(name, options)
The options parameter is optional and its document (json) in the following format
{ capped: <boolean>,
  autoIndexId: <boolean>,
  size: <number>,
  max: <number>,
  storageEngine: <document>
}
Of importance here is the ‘capped’ boolean, which indicates that the collection is capped. If this is set to true then ‘size’ is also required to be provided. In the following figure I am creating a capped collection called “Subjects”

Simply those are the few and quick ways to creating collections for mongo.
Documents.
When you create a collection implicitly mongodb does not create the collection per se. For the collection to be available you need to insert a document into it. Documents are the just json objects (key-value pairs) which are contained in a collection.
Mongodb has various methods to adding new documents to a collection.
One of the method is db.collection.insert();
 db.members.insert(
   {
     name: "name1",
     accounts: [ { name: "Savings", balance: 25 }, { name: "Fixed", balance: 50 } ],
     category: "junior"
   }
)
The above operation return, showing how many documents have been inserted..
WriteResult({ "nInserted" : 1 })
Also a quick note is that you can pass a collection to insert and it will insert all the documents, but will return the following result on success. We will discuss this and bulk insert in a future post. 🙂
BulkWriteResult({
   "writeErrors" : [ ],
   "writeConcernErrors" : [ ],
   "nInserted" : 3,
   "nUpserted" : 0,
   "nMatched" : 0,
   "nModified" : 0,
   "nRemoved" : 0,
   "upserted" : [ ]
})
The other option to adding documents to our collection is using db.collection.save(). This operation updates an existing document or inserts a new document. If the document passed to this operation has ‘_id’ parameter then result would be an update by getting the document with the ‘_id’ and replacing all fields in the existing record with the fields in the document, and if the document does not exist with the specified ‘_id’ it perfoms an insert. The write concern can be taken as being synomous more to isolation levels
db.collection.save(
   <document>,
   {
     writeConcern: <document>
   }
)
Conclusion
There is alot to write about this topic, but lets end it here for now. There will be more on future posts. In this post we have been able to cover on how to create mongo database, collections and documents. We also quickly and simply differentiated on ‘save’ and ‘insert’ operations for documents, so you know how , when and where to use them.
Feel free to drop a comment or drop an email with your concerns and views on the topic.
Stay tuned for part 3 -Happy coding!! 🙂
Tired of clicking to your mongodb installation folder to spin it up!! Never again! Setting path for mongodb
Long title huh? Leave it alone just dive into the content then you will get the meaning of it 🙂
Mongodb is one of the fastest evolving nosql databases. And in an effort to learn it, I have found myself so stuck into it. It sometimes come with it own developer challenges. And in this series of posts to follow, I will be highlighting what I have and will find interesting and worthy sharing with you.
My assumption in these posts is and will be that you have downloaded mongodb here and installed it your machine as per the well documented installation guide.
In my case, I did that on my box running windows 8.1, and my installation path was “C:\Program Files\MongoDB\Server\3.0\bin”. At first I was very excited to run “cd” or better “pushd” to this directory to spin up my mongod.exe instance like show:

After a few times of doing this, it became kind of boring and I started to research on a better way to do this. The simplest solution that I found was to add the mongodb bin installation path (“C:\Program Files\MongoDB\Server\3.0\bin”) to the system environment path variable. So copy the path to your clipboard, the go my computer and follow the step as highlighted below.
NB: Assumption here is that you are on windows 8.1/8. If not find out how to get to the “Advanced system settings” in your operating system.

Once you hit step 4, double click and you will definitely get a small pop up window, which allows you to edit the “Path” variable. You might find other paths there, seperated with semi-colon. You simply append the path on your clipboard, and make sure you separate with semi-colon as well. After successfully pasting your path and made sure it looks like I have highlighted in yellow, just click ok to all the opened windows.
And with that in place, you can simply open any command prompt, including “cmd” and type any mongodb command e.g mongod.exe, mongo.exe etc like show below. You will need to close any opened prompts to achieve get the effects, by this I mean for any opened prompt the following will not work, you will need to close it.

You can see now, I don’t have to navigate to the installation directory to spin up mongod instance. Just from my command prompt, I can now run mongod.exe.
One of the reasons, I found this relevant to share is because there are alot of posts to follow regarding mongodb, and we will always be referring to this post for spinning up our mongodb instance.
Happy coding and keep an eye for the next post soon!
And we are back!!!
Warm greeting after long silence! It’s been a long time since our last interaction here. Lot of things transpired since then from serious business to crafting applications, learning and putting into work cool stuff and technologies.
Other than that there has been alot of changes including an additional year in my life though I feel young :). Jokes aside, I hope you as well has been doing well in your life and great stuff in the software development arena and careers.
So I would like to welcome you back to this interactive blog, and be ready to learn cool stuff, new technologies including the “why’s”, “how’s”, “when’s”, “do’s” and “dont’s” in various technologies ranging from .NET stack including AZURE, C#,F#, open source and my new love “MEAN” stack. It will be amazing, you got to trust me for this as I have developed the virtue of honest since then.
There will be alot of thorough research work before publishing, and this will be to make sure that information will be easy to understand, as I look forward for “Simplicity over complexity” moving forward.
Don’t miss, subscribe to this blog now!!! 😀
Happy new year and coding!!
When to use Response.Redirect and Server.Transfer?
Recently I had to respond to an issue which was a result of using wrongly of the aforementioned in web forms. Each of them are used with a specific purpose and not as an alternative to another. And so let see when to use either of them and in what situations.
They do have distinct notable differences. One of them being with Response.Redirect the browser url changes to the targeted page while in Server.Transfer the url remains the same.
With Response.Redirect a HTTP 302 message is usually sent do the browser while in Server.Transfer all happens without the browser knowing anything, and it ends up recieving a different content from the requested.
Another difference is that the Server.Transfer consumes more server power in comparison to Response.Redirect.
Server.Transfer cant send a user to an external site while Response.Redirect can.
When to use Response.Redirect:
- we want to redirect the request to some plain HTML pages on our server or to some other web server
- we don’t care about causing additional roundtrips to the server on each request
- we do not need to preserve Query String and Form Variables from the original request
- we want our users to be able to see the new redirected URL where he is redirected in his browser (and be able to bookmark it if its necessary)
When to use Server.Transfer:
- we want to transfer current page request to another .aspx page on the same server
- we want to preserve server resources and avoid the unnecessary roundtrips to the server
- we want to preserve Query String and Form Variables (optionally)
- we don’t need to show the real URL where we redirected the request in the users Web Browser
I do hope this will help someone out there who needs to find which to use and when. This might not be exhaustive but it’s worthy you consideration
Happy coding!
Backbone.js demisfied
This is the first post in backbone.js series which aims at looking at the overview of what is backbone. In this series we will look at various backbone aspects like the Models, Views, Collections, Eventing system, Event aggregator and its uses. And I do promises that by the end of the series you will be able to make decision of when to use backbone.js.
What is backbone.js?
From backbone.js home page, it is described as giving structure to web applications by providing models with key-value binding and custom events, collections with rich API of enumerable functions, Views with declaritive event handling and connects it all to you existing API over a RESTful json interface.
I would also take backbone.js being more of a javascript library providing basic and helpful types for building and organizing rich javascript interfaces, qualifying it not to be more of a framework.
The big and best differences between a library and a framework a library is something you call from your program. A framework is something that calls into your program, or better frameworks sort of control how you design your code or applications. They specify what you can do with them and how to do it. On the other hand libraries provide with some useful features and then you can move on and implement or even extend them to build your application. Frameworks contain key distinguishing features that separate them from normal libraries like inversion of control. In a framework, unlike in libraries or normal user applications, the overall program’s flow of control is not dictated by the caller, but by the framework.
There has been conflicting opinion of whether backbone is MVC or not, a library or a framework etc. But I would like to take sometime to simply look at what MVC is.
What is MVC?
In short MVC stands for Model-View-Controller.
Model– represent application data perhaps for a specific domain that an application is dealing with. So in short Models are at the heart of any JavaScript application, containing the interactive data as well as a large part of the logic surrounding it: conversions, validations, computed properties, and access control. This how backbone takes a model to be.
View -visual representation of the model. The view is dependent on the model and in case the model changes then the view should update accordingly. The user usually interacts with the view setting and changing the view thence the model. In most cases or ideal scenario it not the work of the view to update the model but the controller. e.g when a click occurs the information should be taken to the controllers to update the model accordingly.
Controller-controls the co-rodination of the views and the model. They are the mediators between the models and the views. They update the views when the model changes and update the models when any changes occurs on the view.
It is in the controllers where most javascripts frameworks and libraries brings issues as the developers of the framework tend to try to map one to one with the server side MVC frameworks, hence contradicting C on the client frameworks. This issue however is subjective and brings issues with understanding classical MVC patterns and the role of controllers in modern frameworks.
And therefore in respect to backbone, truly and distinctly it has model and views, but does not have true controllers since its views and routers sort of act similar to controller but neither of them can act as a controller on its own. And this on my own opinion does not qualify backbone a mvc framework and I consider it a member of MV* family with its own implementation.
Backbone had its own Backbone.Controller which was not making sense in the context in which it was used and therefore it was renamed to Backbone.Router. And therefore backbone shares the responsibility of a controllers with the view and the router.Router handle little more of the controller work as you can bind the events and the models and any other customizations you may like regarding the same.
Some few points to note regarding backbone for this post is:
- Backbone core components are Model, View, Collection and Router. Therefore I would not be wrong saying it has borrowed from MVC from framework.
- You have more control of what is happening.Backbone has one of the best eventing system which is great between the views and models. You can even attach an event to any attribute in a model and you will be notified when the property changes.
- Supports data bindings through manual events
- Great support for RESTful interfaces and so models can easily be tied to the backend API’s like ASP NET WEB API.
- It uses underscore.js templating engine which is great.
- Clear and flexible conventions for structuring applications. Its not opinionated, and so does not force you to use all of its components and can only work with only those needed.
- Initially you might have to write more javascript code but its very easy to implement complex user interactions.
Feel free to engage me in discussion, questions, recommendations or even you input. There are more to come on specific backbone intrinsics.
Happy coding 🙂
What really is Katana and owin?
What really is really Katana? How about Owin? After playing around with Katana, I really found it worthywhile to post about what I have found regarding them. OWIN ( initials for Open Web Interface for .NET )is a set of specifications that defines a stardand interface between which .NET web servers and web applications communicates. Katana on the hand is an implementation of the OWIN.
A little history of ASP NET is that it was released in early 2002 or sometime around then, with .NET framework 1.0 and it was meant to bring a web experience for customers who included classic asp and desktop line of business application developers like VB 6.
There were alot of stuff and concerns brought forward by these two customers, which meant that the framework was to be monolithic leading to inclusion of all concerns in one single package, System.Web. The package included just to mention a few features, Modules, handlers, sesssion, cache, web forms and controls. And all this was meant to run on IIS.
With time the System.Web package became complex because with every new requirement it was added to the package. By default most of the features were turned on by default to seamless intengration .
By then, IIS was the only hosting for ASP NET and most of the features for ASP NET runtime map one to one with those found on the IIS. This was a problem and in around 2008 ASP NET MVC was released which atleast enabled rapid developement and was distributed via nuget. Come 2012 ASP NET WEB APi was released , and unlike ASP NET MVC, WEB API does not rely on System.Web in anyway. Initially WEB API was started by the WCF team, which later was sent to ASP NET team who added capabilities like self hosting.
Thats a little background and history of a few players which brought the idea behind katana. In a modern web application, you can expect to have at least some static files, web api, rendering engine perhaps MVC razor, and perhaps SignalR for some real time communication. And the question is perhaps, couldn’t it be awesome to be able to compose all these or other multiple frameworks together to create a single server?
And there comes Katana which is a set of components for building and running web applications on a common abstraction which is, OWIN…
The primary interface in OWIN is a application delegate or simply AppFunc, which is a delegate that takes IDictionary<string,object> and returns a Task, and the signature is like Func<IDictionary<string,object>,Task>
Katana is meant to offer the following
Portability by reducing to the least primitives as possible
Composability ->Its really easy to compose modules together that will participate in all aspect of the incoming requests.
Performance and scalability -> Uses Async throughout and there is total decoupling of web application and host.
A typical Owin enabled application should have the following layers.
1. Application ->This is your application which could be like ASP NET MVC
2. Application framework -> These could be regular OWIN component implementation giving simple to use API to developers to easily plug-in to the pipeline. For example, we have signalR and Web API, though currently SignalR uses OwinHost.
3.Server –> This is responsible to binding to a port and channels request to the pipeline for processing. e.g SystemWeb, HttpListener o or the new Weblistener
4.Host –> This is a process managers that spans new process call to your code and provides and puts the pipeline in place eg this could be IIS if you will be hosting on IIS, could be OwinHost.exe which is the katana implementation or even you custom process.
Currently, katana embraces conventions over configuration. So when you install owin, when you code runs it goes through you code via reflection looking for a class with name of Startup and a method named “Configuration” taking IAppBuilder interface as the only parameter. IAppBuilder is an interface used to compose modules together. There are alot of extension methods built on top of IAppBuilder which we will explore at a later post.
To recap, let write a simple application and host on a console application. I am using visual studio 2013. Open VS 13, File -> New Project ->Console Application, give a nice name and click Ok. This is a simple console application with nothing to do with Owin. So open Package Manager Console and install the following nuget packages
Install-Package Microsoft.Owin.
install-package microsoft.Owin.Host.HttpListener.
install-package microsoft.owin.hosting
And at least it should be close to

With in we will now add the basic code to host our application. And just as we said we will need to add a class with a name “Startup” and a method “Configuration”. Quickly let to that. After we finish setting up the nuget packages then copy and paste following code to your program.cs file as is
using System;
using Microsoft.Owin.Hosting;
using Owin;

namespace KatanaTest
{
 class Program
 {
 static void Main(string[] args)
 {
 //Create a url
 string uri = "http://localhost:8080";

using (WebApp.Start(uri))
 {
 Console.WriteLine("Server is starting");
 Console.ReadKey();
 Console.WriteLine("Stopping the server");
 }
 }
 }

///
/// Note the name "Startup"
 ///
 public class Startup
 {
 ///
/// Note the name and parameter
 ///
 ///
 public void Configuration(IAppBuilder app)
 {
 //Simple write to the response stream here
 app.Run(x =>
 x.Response.WriteAsync("We are just testing this application"));
 }
 }
}
Run the code and open you favourite browser and paste http://localhost:8080/. The result which would be “We are just testing this application” printed on the browser. This means that you have successfully written you first owin application hosted on a console application.
Katana is utilized in the ASP NET MVC 5 project template for authetication. In our case we have utilized the simplest method ever to write something on the response stream. But there is alot of extensibility and capabilities with katana where you can plug your own middleware or component in the pipeline, which is how the authetication is plugged in the ASP NET MVC 5. Another post regarding this soon.
But just to point out is that all you really need to write a katana module, is to write a class which has a constructor takes one arguement of type Func<IDictionary<string,object>,Task>, and this represent the next module in the pipeline which you manually call from your component.
Just to demonstrate lets a middleware component that prints some message to the response
using System;
using System.Collections.Generic;
using System.IO;
using System.Threading.Tasks;
using Microsoft.Owin.Hosting;
using Owin;

namespace KatanaTest
{
 class Program
 {
 static void Main(string[] args)
 {
 //Create a url
 string uri = "http://localhost:8080";

using (WebApp.Start(uri))
 {
 Console.WriteLine("Server is starting");
 Console.ReadKey();
 Console.WriteLine("Stopping the server");
 }
 }
 }

///
/// Note the name "Startup"
 ///
 public class Startup
 {
 ///
/// Note the name and parameter
 ///
 ///
 public void Configuration(IAppBuilder app)
 {
 app.Use();
 //Simple write to the response stream here
 app.Run(x =>
 x.Response.WriteAsync("We are just testing this application"));

//Plug our component here

 }
 }

public class HelloWorld
 {
 private Func<IDictionary<string, object>, Task> _next;
 public HelloWorld( Func<IDictionary<string,object>,Task> next)
 {
 _next = next;
 }

public Task Invoke(IDictionary<string, object> environment)
 {
 var response = environment["owin.ResponseBody"] as Stream;

using (var writer = new StreamWriter(response))
 {
 return writer.WriteAsync("Hello!!");
 }
 }
 }
}
Its as easy as that, and now when you run the application you see “Hello!” on the browser. Something worthy noting here is “owin.ResponseBody”, which’s one of the key in the Environment dictionary. For now take that dictionary as the HttpContext which contains all the information about a request. There are more Owin specific keys in the dictionary which we will explore in a later post.
That’s it for now, there is more to come on this same topic especially on how to write to write and hook up your own modules in the pipeline. You may also be interested in Checking-out-the-Helios-IIS-Owin-Web-Server-Host which I may recommend to get some information on the topic.
Happy coding and kindly get involved via comments, questions or suggestions. Thanks for reading 🙂

